
In Chapter 9, you learned how to deploy an AI application to production and use the LangGraph Platform to host and debug it. While your app can handle user inputs and complex workflows, the underlying LLM remains nondeterministic and susceptible to hallucinations. As discussed earlier, LLMs may produce inaccurate, outdated, or misleading outputs due to factors such as prompt design, input formatting, and retrieved context. In production, these failures can harm both brand reputation and customer trust.
To address these risks, it’s essential to build a robust system for testing, evaluation, monitoring, and continuous improvement. A strong testing workflow helps identify and resolve AI-related issues quickly, both before deployment and in live environments.
In this chapter, you’ll learn how to design an iterative testing system across key stages of the LLM application lifecycle, ensuring consistent performance and long-term reliability.
Table of Contents
Testing Techniques Across the LLM App Development Cycle
Before building a testing system, it’s helpful to understand how testing applies across the three core stages of LLM application development:
Design
At this stage, tests are embedded directly into the application. These may include runtime assertions that surface failures and enable LLM self-correction. The goal is to handle errors early, before they impact users.
Preproduction
Here, tests are executed just before deployment. This stage focuses on identifying and fixing regressions to ensure stability prior to release.
Production
In production, tests run continuously to monitor real user interactions and detect failures. Insights from this stage are fed back into design and preproduction for remediation.
Together, these stages form a continuous improvement loop: design, test, deploy, monitor, fix, and redesign (see Figure 1).
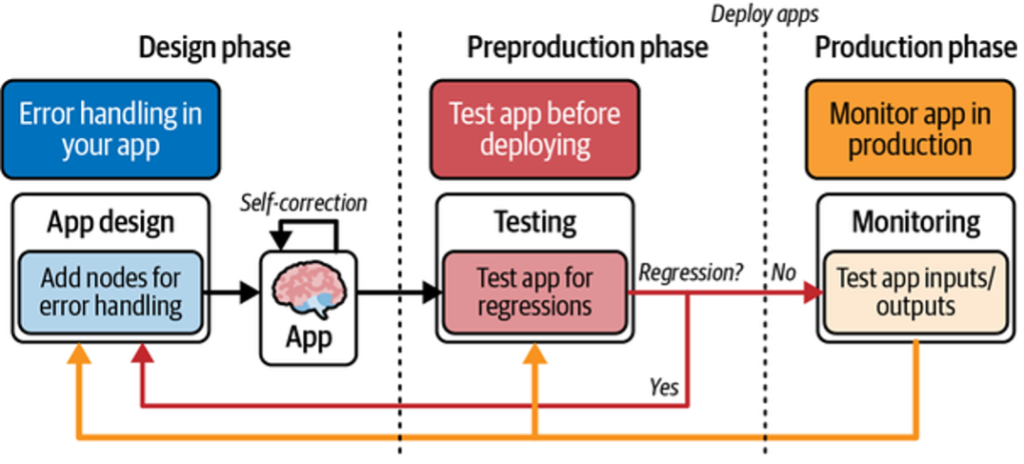
This cycle enables fast, efficient identification and resolution of production issues.
Next, we’ll explore testing techniques specific to each stage.
The Design Stage: Self-Corrective RAG
As discussed earlier, LLM applications can handle runtime errors by feeding them back to the model for self-correction. This section walks through a self-corrective RAG pattern using LangGraph to orchestrate error handling and control flow.
Traditional RAG systems are prone to hallucinations when retrieved context is incomplete or irrelevant. A common mitigation is to use an LLM to grade retrieval relevance and validate generated answers before returning them to the user. LangGraph makes this iterative control flow explicit, as shown in Figure 2.
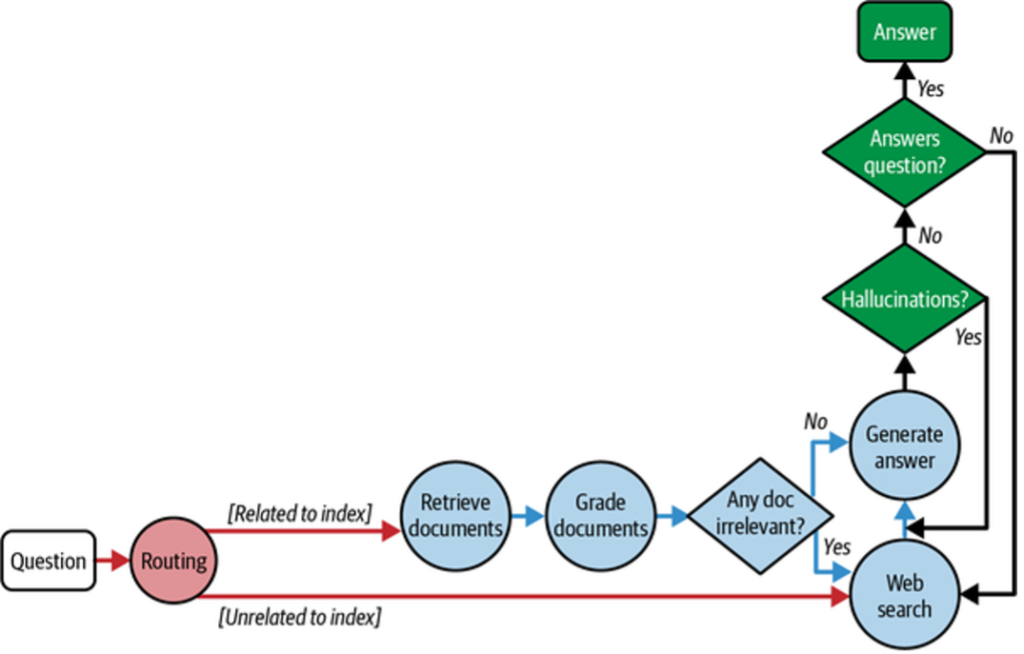
Control Flow Overview
- The user query is routed to the appropriate retrieval method (e.g., vector store or web search).
- Retrieved documents are graded by the LLM for relevance.
- If relevant, the LLM generates an answer.
- The answer is checked for hallucinations before being returned.
- If retrieval or generation fails, web search is used as a fallback.
This loop enables iterative self-correction and higher-quality outputs.
Example Implementation
Below is a minimal example that indexes three LangChain blog posts and performs vector-based retrieval.
Python
from langchain.text_splitter import RecursiveCharacterTextSplitter
from langchain_community.document_loaders import WebBaseLoader
from langchain_community.vectorstores import InMemoryVectorStore
from langchain_openai import OpenAIEmbeddings
from langchain_core.prompts import ChatPromptTemplate
from pydantic import BaseModel, Field
from langchain_openai import ChatOpenAI

# --- Create an index of documents ---
urls = [
    "https://blog.langchain.dev/top-5-langgraph-agents-in-production-2024/",
    "https://blog.langchain.dev/langchain-state-of-ai-2024/",
    "https://blog.langchain.dev/introducing-ambient-agents/",
]

docs = [WebBaseLoader(url).load() for url in urls]
docs_list = [item for sublist in docs for item in sublist]

text_splitter = RecursiveCharacterTextSplitter.from_tiktoken_encoder(
    chunk_size=250, chunk_overlap=0
)
doc_splits = text_splitter.split_documents(docs_list)

vectorstore = InMemoryVectorStore.from_documents(
    documents=doc_splits,
    embedding=OpenAIEmbeddings(),
)

retriever = vectorstore.as_retriever()
results = retriever.invoke(
    "What are 2 LangGraph agents used in production in 2024?"
)
print("Results:\n", results)
Grading Retrieval Relevance
Retrieved documents are graded by the LLM using a structured binary decision (yes / no). This enables deterministic routing in the control flow.
Python
class GradeDocuments(BaseModel):
    binary_score: str = Field(
        description="Documents are relevant to the question, 'yes' or 'no'"
    )

llm = ChatOpenAI(model="gpt-3.5-turbo", temperature=0)
structured_llm_grader = llm.with_structured_output(GradeDocuments)

system = """You are a grader assessing relevance of a retrieved document to a user question.
Give a binary score 'yes' or 'no'."""

grade_prompt = ChatPromptTemplate.from_messages([
    ("system", system),
    ("human", "Retrieved document:\n{document}\n\nUser question:\n{question}")
])

retrieval_grader = grade_prompt | structured_llm_grader
Output:
binary_score='yes'
Using Pydantic/Zod ensures the decision can be consumed programmatically by LangGraph.
Observability and Fallbacks
In LangSmith, the full execution trace across graph nodes is visible (Figure 3), making it easy to debug routing and grading decisions.
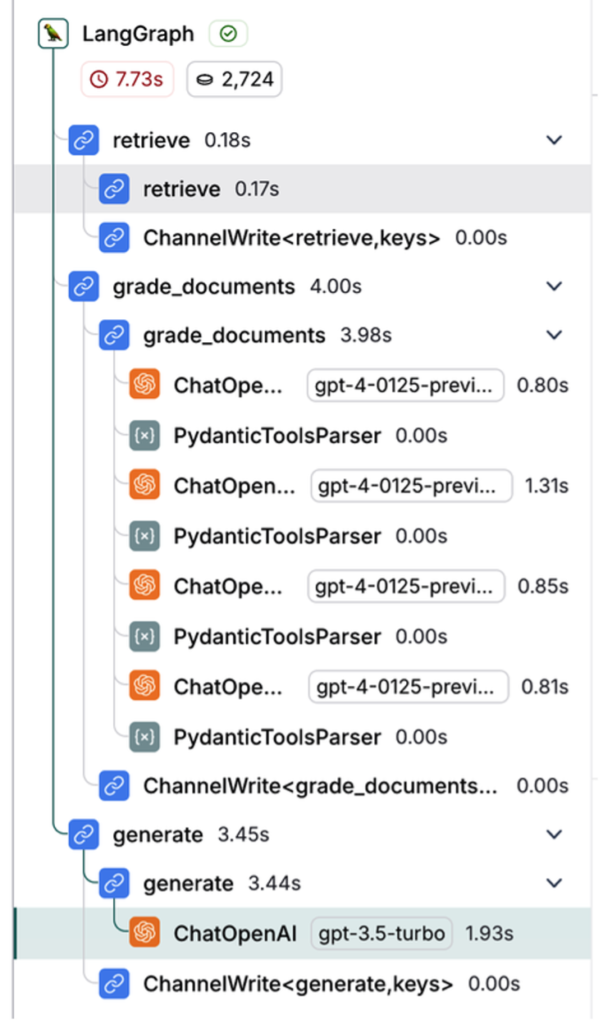
When a query cannot be answered from the vector index, the graph falls back to web search. A transform_query node rewrites the query to improve search quality.
The Preproduction Stage
The goal of the preproduction testing stage is to evaluate your application before it reaches production. At this stage, you measure accuracy, latency, and cost to understand how the LLM performs under expected usage.
Creating Datasets
Before testing, define the scenarios you want to evaluate. A dataset is a collection of inputs and expected outputs used to measure your LLM app’s behavior.
Common Dataset Creation Methods
Manually curated examples
Handwritten test cases based on expected user inputs and ideal outputs. Small, high-quality datasets typically contain 10–50 examples and can be expanded over time as new edge cases appear.
Application logs
Real user inputs collected after deployment can be added to datasets. This ensures coverage of realistic and frequently asked questions.
Synthetic data
Artificially generated examples used to simulate edge cases or expand limited datasets by sampling and mutating existing inputs.
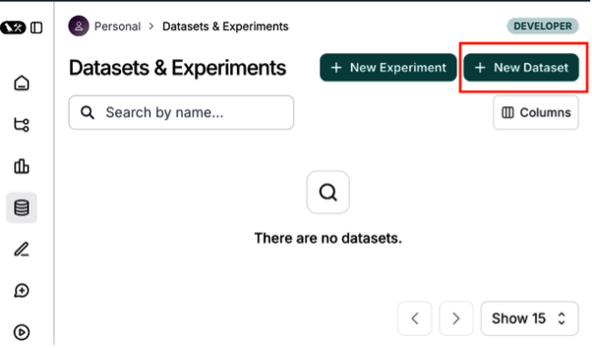
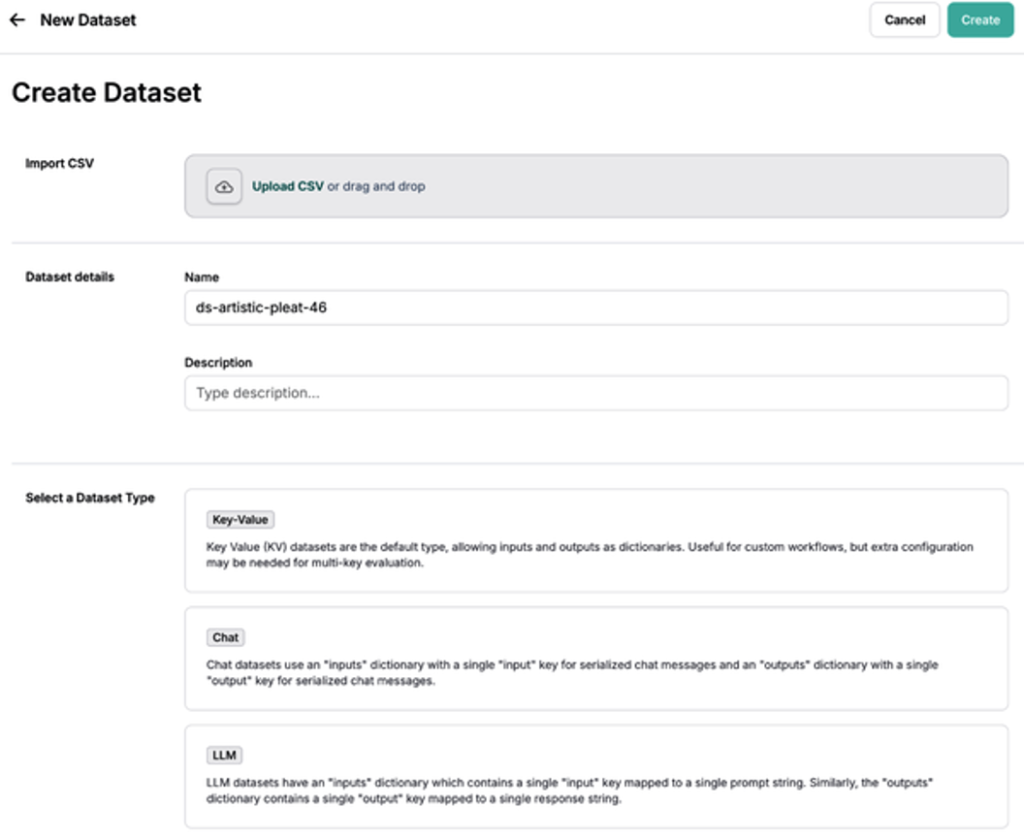
Creating Datasets in LangSmith
In LangSmith, navigate to Datasets and Testing and click + New Dataset (Figure 4). Provide a name, description, and dataset type. You can also upload your own data using Upload a CSV dataset.
Dataset Types in LangSmith
LangSmith supports three dataset types:
Key-value (kv) dataset
- Inputs and outputs are arbitrary key-value pairs
- Most flexible and default option
- Ideal for chains and agents with multiple inputs or outputs
LLM dataset
- Designed for completion-style models
- Single prompt input and single text output
- Provides a standardized evaluation format
Chat dataset
- Structured chat messages as inputs and outputs
- Useful for conversational agents and chatbots
The kv dataset is the most versatile and commonly used option (Figure 5).
Adding Examples and Schemas
Add test cases by clicking Add Example, supplying input and output JSON objects (Figure 6).
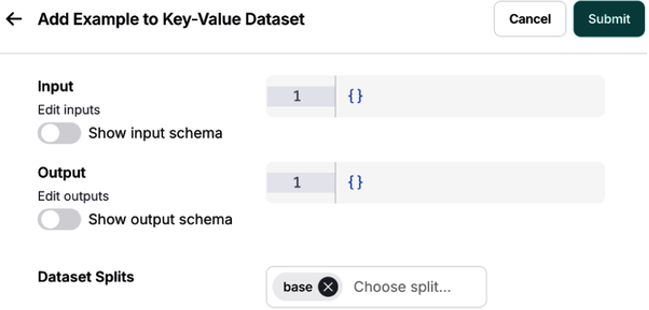
Optionally, define a dataset schema to enforce structure and consistency across examples (Figure 7).

This completes the foundation for preproduction testing, enabling consistent, measurable evaluation of your LLM application before release.
Defining Your Evaluation Criteria
After creating a dataset, the next step is to define evaluation metrics to assess outputs before production. This batch evaluation on a fixed test suite is commonly called offline evaluation.
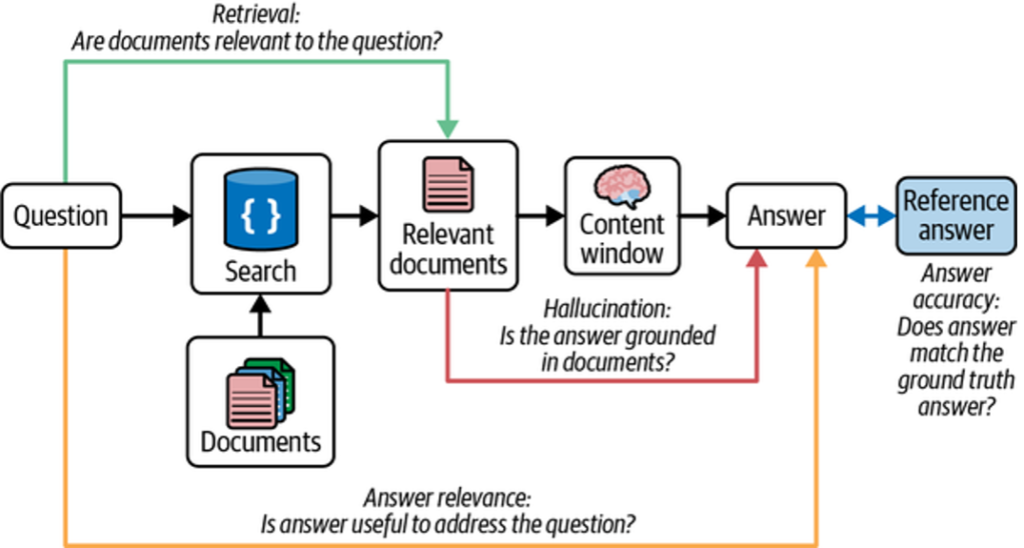
Offline evaluation may include ground truth references (expected outputs), allowing direct comparison between your application’s responses and known correct answers (Figure 8).

Evaluator Types
There are three primary ways to score LLM application performance:
Human evaluators
When requirements can’t be expressed programmatically, human reviewers can score outputs based on qualitative criteria. LangSmith streamlines this process using annotation queues to collect and manage feedback.
Heuristic evaluators
Heuristics are hardcoded checks or assertions that compute scores automatically. These can be:
- Reference-free (e.g., valid JSON, schema compliance)
- Reference-based (e.g., accuracy against ground truth)
Heuristics are especially useful for structured outputs and code-generation tasks.
LLM-as-a-judge evaluators
This approach encodes human grading rules into an LLM prompt. The model evaluates outputs relative to reference answers stored in the dataset. As these evaluators are iterated on, their scores must be audited and tuned for consistency.
Evaluation Strategy
Start with heuristic evaluators, then layer in human evaluation, and finally introduce LLM-as-a-judge to scale human review. This staged approach balances reliability and automation.
When using LLM-as-a-judge, keep prompts simple and explicit. Avoid vague scoring systems (e.g., 0–10 scales with unclear distinctions).
Figure 9 shows an LLM-as-a-judge evaluator applied to a RAG use case, where the reference answer represents ground truth.
Improving LLM-as-a-Judge Performance
LLM-as-a-judge evaluators are effective for grading natural language outputs, but trust and consistency can be challenging. Traditional prompt engineering is often slow and brittle.
LangSmith addresses this with a few-shot learning approach, where human corrections to evaluator outputs are saved and reused as examples in future evaluations.
Few-Shot Evaluation Workflow
- The LLM evaluates generated outputs based on defined criteria.
- Humans correct or adjust evaluator feedback in LangSmith.
- Corrections are stored as few-shot examples, optionally with explanations.
- These examples are injected into future evaluation prompts.
Over time, the evaluator aligns more closely with human judgment, reducing manual tuning while improving score quality.
Configuring LLM-as-a-Judge in LangSmith
To set up offline evaluation:
- Navigate to Datasets and Testing and select a dataset.
- Click Add Auto-Evaluator.
- Choose LLM-as-a-judge, name the evaluator, and select Create Few-Shot Evaluator .
This creates a dataset that automatically stores few-shot examples derived from evaluator corrections. These examples are injected into the system prompt during evaluation.
You can also define scoring criteria using a schema and select primitive score types such as Boolean or integer.
Once saved, all future experiment runs on the dataset are evaluated using the configured evaluator.
Pairwise Evaluation
Pairwise evaluation compares two outputs at a time, asking which one better meets the evaluation criteria. This approach is often easier for both humans and LLM judges than absolute scoring.
LangSmith supports pairwise LLM-as-a-judge evaluation, enabling you to:
- Define custom pairwise evaluators
- Compare outputs from different application versions
- Visualize preferences directly in the UI
After running an evaluation, results appear under the Pairwise Experiments tab. Selecting a RANKED_PREFERENCE score reveals detailed evaluation traces.
This concludes evaluation criteria definition in the preproduction stage, setting the foundation for reliable, scalable LLM testing before deployment.
Regression Testing
In traditional software development, tests are expected to pass 100% once validated. AI systems differ: LLM outputs can vary over time due to model drift, data distribution changes, or model updates. As a result, perfect scores on evaluation datasets are not always realistic.
This has two key implications.
First, it’s essential to track evaluation results over time. Regression testing ensures that updates to your application—such as prompt changes or model upgrades—do not degrade performance relative to a known baseline.
Second, beyond aggregate scores, you must compare individual data points across experimental runs to understand exactly where behavior improved or regressed.
Regression Testing in LangSmith
LangSmith provides native support for regression testing through its experiment comparison view, which highlights changes relative to a baseline run. Improved and regressed outputs are visually differentiated in the dashboard.
In the Comparing Experiments dashboard, you can:
- Compare multiple experiments tied to the same dataset and view aggregate run statistics
- Set a baseline run and detect regressions across new app versions
- Identify specific examples where performance changed
- Drill into individual traces to understand why a regression occurred
This workflow is especially useful when migrating models, adjusting prompts, or rolling out new features.
Regression testing is critical for maintaining consistent LLM application performance over time, despite ongoing changes to models, data, and system behavior.
With preproduction testing strategies covered, we now move on to a concrete use case.
Evaluating an Agent’s End-to-End Performance
Agents enable autonomous workflows through planning, memory, and tool calling. However, testing agents is challenging because the LLM dynamically controls execution flow. Different runs may invoke different tools, take varying numbers of steps, or fail in unexpected ways.
To address this variability, agent evaluation should be performed at three levels of granularity:
Agent Testing Levels
Response (end-to-end)
Evaluates whether the agent successfully completes the task.
- Input: User prompt (+ optional tools)
- Output: Final agent response
Single step
Tests a specific decision or tool call.
- Output: Selected tool call and arguments
Trajectory
Evaluates the full sequence of steps taken by the agent.
- Output: Ordered (or unordered) list of tool calls
Testing the Agent’s Final Response
At the highest level, the agent is treated as a black box. Success is defined by whether the final response matches expectations.
Evaluation setup
- Inputs: User prompt
- Output: Final response
- Evaluator: LLM-as-a-judge
Python
from langsmith import Client
client = Client()

examples = [
    ("Which country's customers spent the most? And how much did they spend?",
     """The country whose customers spent the most is the USA, with a total
expenditure of $523.06"""),
    ("What was the most purchased track of 2013?",
     "The most purchased track of 2013 was Hot Girl."),
    ("How many albums does the artist Led Zeppelin have?",
     "Led Zeppelin has 14 albums"),
    ("What is the total price for the album “Big Ones”?",
     "The total price for the album 'Big Ones' is 14.85"),
    ("Which sales agent made the most in sales in 2009?",
     "Steve Johnson made the most sales in 2009"),
]

dataset_name = "SQL Agent Response"
if not client.has_dataset(dataset_name=dataset_name):
    dataset = client.create_dataset(dataset_name=dataset_name)
    inputs, outputs = zip(
        *[({"input": text}, {"output": label}) for text, label in examples]
    )
    client.create_examples(inputs=inputs, outputs=outputs, dataset_id=dataset.id)

def predict_sql_agent_answer(example: dict):
    msg = {"messages": ("user", example["input"])}
    messages = graph.invoke(msg, config)
    return {"response": messages['messages'][-1].content}
Evaluating the Final Answer with LLM-as-a-Judge
The generated answer is compared against a reference answer using an LLM-based evaluator.
from langchain import hub
from langchain_openai import ChatOpenAI
from langsmith.evaluation import evaluate

grade_prompt_answer_accuracy = hub.pull("langchain-ai/rag-answer-vs-reference")

def answer_evaluator(run, example) -> dict:
    input_question = example.inputs["input"]
    reference = example.outputs["output"]
    prediction = run.outputs["response"]

    llm = ChatOpenAI(model="gpt-4o", temperature=0)
    answer_grader = grade_prompt_answer_accuracy | llm

    score = answer_grader.invoke({
        "question": input_question,
        "correct_answer": reference,
        "student_answer": prediction,
    })["Score"]

    return {"key": "answer_v_reference_score", "score": score}

experiment_results = evaluate(
    predict_sql_agent_answer,
    data=dataset_name,
    evaluators=[answer_evaluator],
    num_repetitions=3,
)
Testing a Single Agent Step
Single-step testing focuses on specific decisions, such as selecting the correct tool.
Evaluation setup
- Input: Prompt and prior context
- Output: Tool call
- Evaluator: Heuristic (binary accuracy)
Example: Tool Selection Validation
from langsmith.schemas import Example, Run

def predict_assistant(example: dict):
    """Invoke assistant for single tool call evaluation."""
    msg = [("user", example["input"])]
    result = assistant_runnable.invoke({"messages": msg})
    return {"response": result}


def check_specific_tool_call(root_run: Run, example: Example) -> dict:
    """
    Check if the first tool call in the response matches the expected tool call.
    """
    # Expected tool call
    expected_tool_call = 'sql_db_list_tables'

    # Run
    response = root_run.outputs["response"]

    # Get tool call
    try:
        tool_call = getattr(response, 'tool_calls', [])[0]['name']
    except (IndexError, KeyError):
        tool_call = None

    score = 1 if tool_call == expected_tool_call else 0
    return {"score": score, "key": "single_tool_call"}


experiment_results = evaluate(
    predict_assistant,
    data=dataset_name,
    evaluators=[check_specific_tool_call],
    num_repetitions=3,
    metadata={"version": metadata},
)
Testing an Agent’s Trajectory
Trajectory testing evaluates the sequence and structure of tool calls, ensuring the agent followed an expected reasoning path.
Evaluation setup
- Input: User prompt
- Output: Sequence of tool calls
- Evaluator: Custom functions (order-sensitive or order-agnostic)
Supported checks include:
- All tools called (any order)
- All tools called (correct order)
- Exact tool sequence match
Observability in LangSmith
All three evaluation strategies—response, step, and trajectory—can be inspected in LangSmith’s experimentation UI, enabling detailed debugging and trace analysis .
These layered evaluation techniques provide a practical foundation for controlling agent cost, reliability, and correctness in the presence of LLM variability and complex tool orchestration.
Production
While preproduction testing is critical, many issues only surface once an LLM
application interacts with real users. These include latency spikes, degraded
relevance or accuracy, prompt injection, and toxic outputs. In production, strong
observability and online evaluation are essential to maintain quality and safety.
The first step is enabling LangSmith tracing.
Tracing
A trace represents the full sequence of steps your application takes from input to
output. LangSmith automatically captures and visualizes these traces, making it
easier to debug behavior and monitor performance in real time.
After installing the required LangChain and LLM dependencies, enable tracing by
setting the following environment variables:
export LANGCHAIN_TRACING_V2=true
export LANGCHAIN_API_KEY=<your-api-key>
export OPENAI_API_KEY=<your-openai-api-key>
Once configured, no additional code is required. Traces are automatically logged to
their associated project in the Tracing projects section of the LangSmith dashboard.
LangSmith provides metrics such as:
- Trace volume
- Success and failure rates
- Latency
- Token usage and cost
Collecting Feedback in Production
Unlike preproduction testing, production evaluation typically lacks ground truth
references. Instead, applications rely on reference-free, real-time evaluation, also
known as online evaluation.
Two primary feedback sources are commonly used:
User feedback
User feedback can be collected explicitly (e.g., thumbs up/down, comments) or
implicitly (e.g., engagement signals). In LangSmith, feedback can be attached to
entire traces or individual spans, either inline or through annotation queues.
LLM-as-a-judge feedback
LLM-based evaluators can be applied directly to production traces to detect issues
such as hallucinations, irrelevance, or toxicity. These evaluators reuse the same
mechanisms introduced in preproduction auto-evaluation.
Classification and Tagging
To enforce guardrails and gain insights (e.g., toxicity detection or sentiment analysis),
inputs and outputs must be classified and labeled.
- If no ground truth labels exist, LLM-as-a-judge evaluators can perform
classification based on defined criteria. - If labeled data is available, custom heuristic evaluators can score outputs
against known class labels.
This tagging layer enables both safety enforcement and analytics.
Monitoring and Fixing Errors
LangSmith tracing helps surface errors and edge cases in production. These failures
can be added back into offline test datasets to prevent regressions in future releases.
A common best practice is phased rollout:
- Release to a small group of beta users first
- Collect traces, feedback, and errors
- Expand test datasets with real-world edge cases
- Validate cost, latency, and output quality before full launch
Production monitoring closes the loop between real-world usage and continuous
improvement, ensuring your LLM application remains reliable, safe, and performant
over time.
Summary
Robust testing is essential for building LLM applications that are accurate, reliable, fast, safe, and cost-efficient. This chapter outlined a three-stage testing lifecycle that forms a continuous data loop across the lifetime of an application.
During the design stage, in-application error handling enables self-correction before issues reach the user. Preproduction testing evaluates updates against performance baselines to prevent regressions. In production, monitoring and online evaluation surface real-world errors and usage patterns, feeding insights back into the design process.
Together, testing, evaluation, monitoring, and continuous improvement create a virtuous cycle. This approach accelerates iteration, reduces risk, and—most importantly—ensures your LLM application consistently delivers results users can trust.