
So far, we’ve covered the core concepts and tools needed to build an AI application. You’ve learned how to use LangChain and LangGraph to generate LLM outputs, retrieve indexed data, and add memory and agency.
However, your application still runs locally, meaning external users can’t access it.
In this chapter, you’ll learn best practices for deploying your AI application to production, along with tools for debugging, collaboration, testing, and monitoring LLM systems.
Let’s get started.
Table of Contents
Prerequisites
To deploy your AI application, you’ll need services for hosting, data storage and retrieval, and monitoring. In this chapter’s deployment example, we use:
- Vector store: Supabase
- Monitoring & debugging: LangSmith
- Backend API: LangGraph Platform
We’ll explore each component and how to adapt it to your use case. First, let’s install the required dependencies and configure environment variables.
To follow along, fork the provided LangChain GitHub template, which contains the full logic for a retrieval-based agent application.
Install Dependencies
Follow the instructions in the README.md to install project dependencies.
If you’re not using the template, install dependencies directly from the relevant pyproject.toml or package.json files.
Next, create a .env file with the following variables:
OPENAI_API_KEY=
SUPABASE_URL=
SUPABASE_SERVICE_ROLE_KEY=

# tracing
LANGCHAIN_TRACING_V2=true
LANGCHAIN_ENDPOINT="https://api.smith.langchain.com"
LANGCHAIN_API_KEY=
We’ll walk through how to obtain each value next.
Large Language Model
The LLM generates responses for user queries. LangChain supports multiple providers, including OpenAI, Anthropic, Google, and Cohere.
In this example, we use OpenAI. Retrieve your API key from the OpenAI dashboard and set it as OPENAI_API_KEY in your .env file.
Vector Store
As discussed earlier, a vector store manages vector embeddings of your data and enables similarity search and context retrieval, helping the LLM generate accurate, query-aware responses.
For deployment, we’ll use Supabase, a PostgreSQL-based vector store powered by the pgvector extension for storing and querying embeddings.
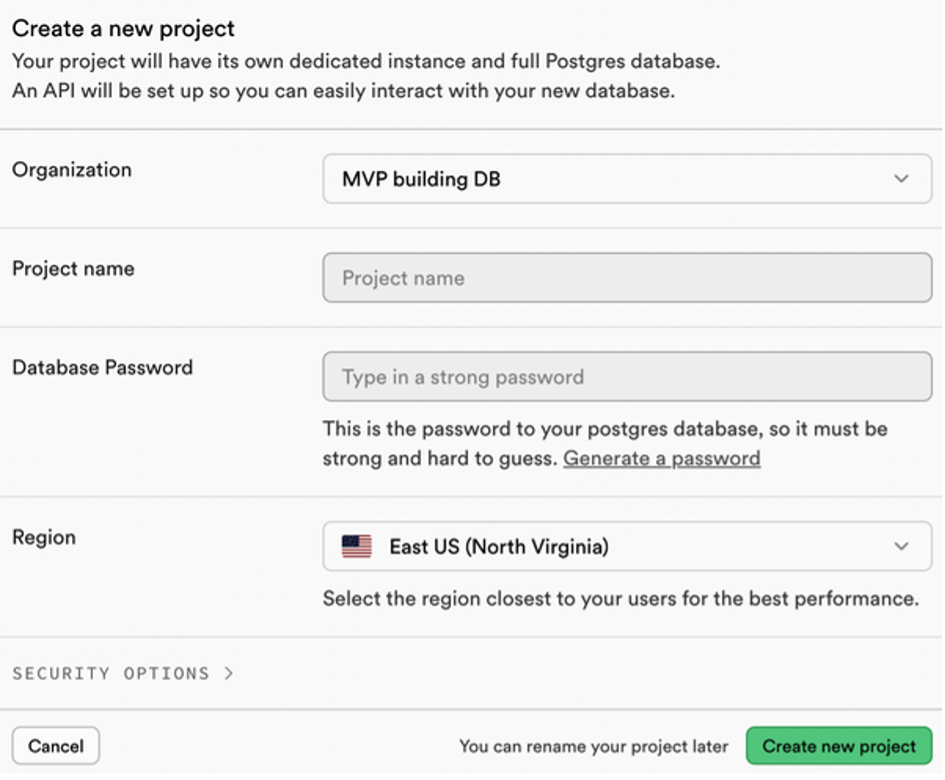
If you haven’t already, create a Supabase account and start a New project from the dashboard. Complete the setup and save your database password (see Figure 1).
Once the project is ready, go to Project Settings → Configuration → API. Copy:
- Project URL →
SUPABASE_URL - service_role API key →
SUPABASE_SERVICE_ROLE_KEY
Add both values to your .env file.
Enable pgvector and Create Tables
Open the Supabase SQL editor and run the following scripts.
Enable the pgvector extension:
-- Enable the pgvector extension
create extension vector;
Create a table to store document embeddings:
-- Create a table to store your documents
create table documents (
  id bigserial primary key,
  content text, -- corresponds to Document.pageContent
  metadata jsonb, -- corresponds to Document.metadata
  embedding vector(1536) -- 1536 for OpenAI embeddings
);
You should now see the documents table in your database.
Create a Similarity Search Function
Next, create a database function to perform vector similarity search:
-- Create a function to search for documents
create function match_documents (
  query_embedding vector(1536),
  match_count int DEFAULT null,
  filter jsonb DEFAULT '{}'
) returns table (
  id bigint,
  content text,
  metadata jsonb,
  embedding jsonb,
  similarity float
)
language plpgsql
as $$
#variable_conflict use_column
begin
  return query
  select
    id,
    content,
    metadata,
    (embedding::text)::jsonb as embedding,
    1 - (documents.embedding <=> query_embedding) as similarity
  from documents
  where metadata @> filter
  order by documents.embedding <=> query_embedding
  limit match_count;
end;
$$;
The match_documents function:
- Filters documents using metadata (
@>). - Computes cosine similarity.
- Orders results by similarity.
- Limits results via
match_count.
Using Supabase as a Vector Store
Once configured, you can use Supabase as a vector store in LangChain.
import os
from langchain_community.vectorstores import SupabaseVectorStore
from langchain_openai import OpenAIEmbeddings
from supabase.client import Client, create_client

supabase_url = os.environ.get("SUPABASE_URL")
supabase_key = os.environ.get("SUPABASE_SERVICE_ROLE_KEY")
supabase: Client = create_client(supabase_url, supabase_key)

embeddings = OpenAIEmbeddings()

vector_store = SupabaseVectorStore(
    embedding=embeddings,
    client=supabase,
    table_name="documents",
    query_name="match_documents",
)

# Test similarity search
query = "What is this document about?"
matched_docs = vector_store.similarity_search(query)
print(matched_docs[0].page_content)
Output:
The powerhouse of the cell is the mitochondria [{"source":"https://example.com"}]
For the complete Supabase vector store implementation, refer to the LangChain GitHub template mentioned earlier.
Backend API
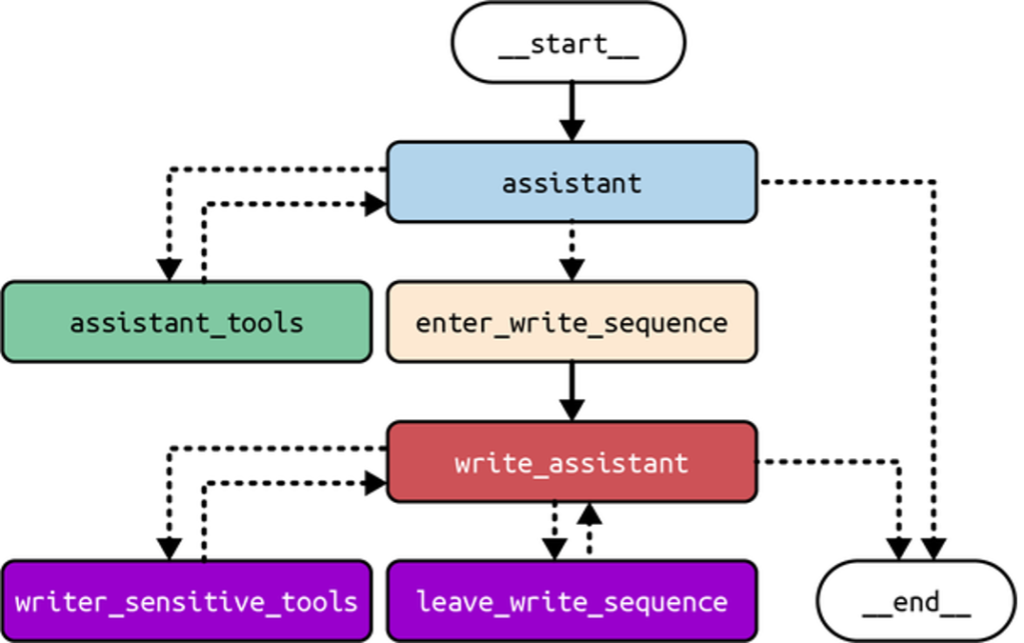
As covered earlier, LangGraph is a low-level open source framework for building complex, agentic LLM systems. It provides fine-grained control over application flow and state, built-in persistence, and advanced memory and human-in-the-loop features. Figure 2 shows an example of LangGraph’s control flow.
To deploy LangGraph-based applications, we use LangGraph Platform, a managed service for hosting and scaling LangGraph agents in production.
As agent workloads grow, uneven task distribution can overload systems and cause downtime. LangGraph Platform addresses this with horizontally scalable task queues and servers, along with a robust Postgres checkpointer for efficiently storing large states and handling many concurrent users. This enables fault-tolerant, scalable deployments.
LangGraph Platform supports real-world interaction patterns, including:
- Double texting for handling new inputs on active threads
- Asynchronous background jobs for long-running tasks
- Cron jobs for scheduled workflows
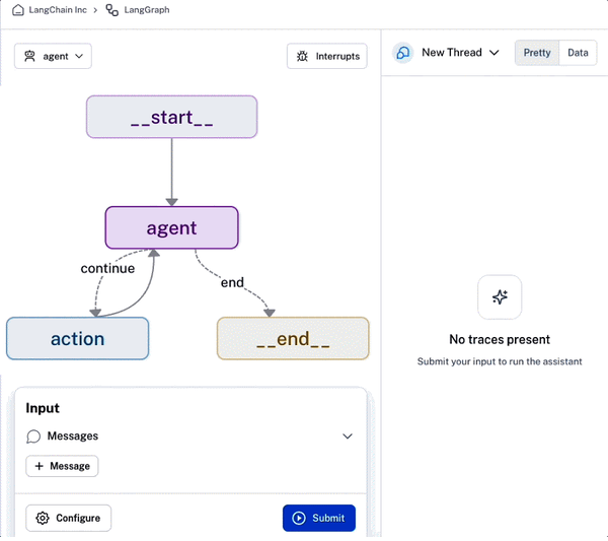
Beyond deployment, LangGraph Platform offers built-in collaboration and monitoring tools. It includes LangGraph Studio, a visual environment for debugging, testing, and editing agents, as well as sharing them with teammates for rapid iteration (Figure 3).
Finally, LangGraph Platform simplifies production deployment with one-click submissions.
Create a LangSmith Account
LangSmith is an all-in-one platform for debugging, testing, collaborating on, and monitoring LLM applications. It integrates seamlessly with LangGraph Platform and is accessible directly from the LangSmith UI.
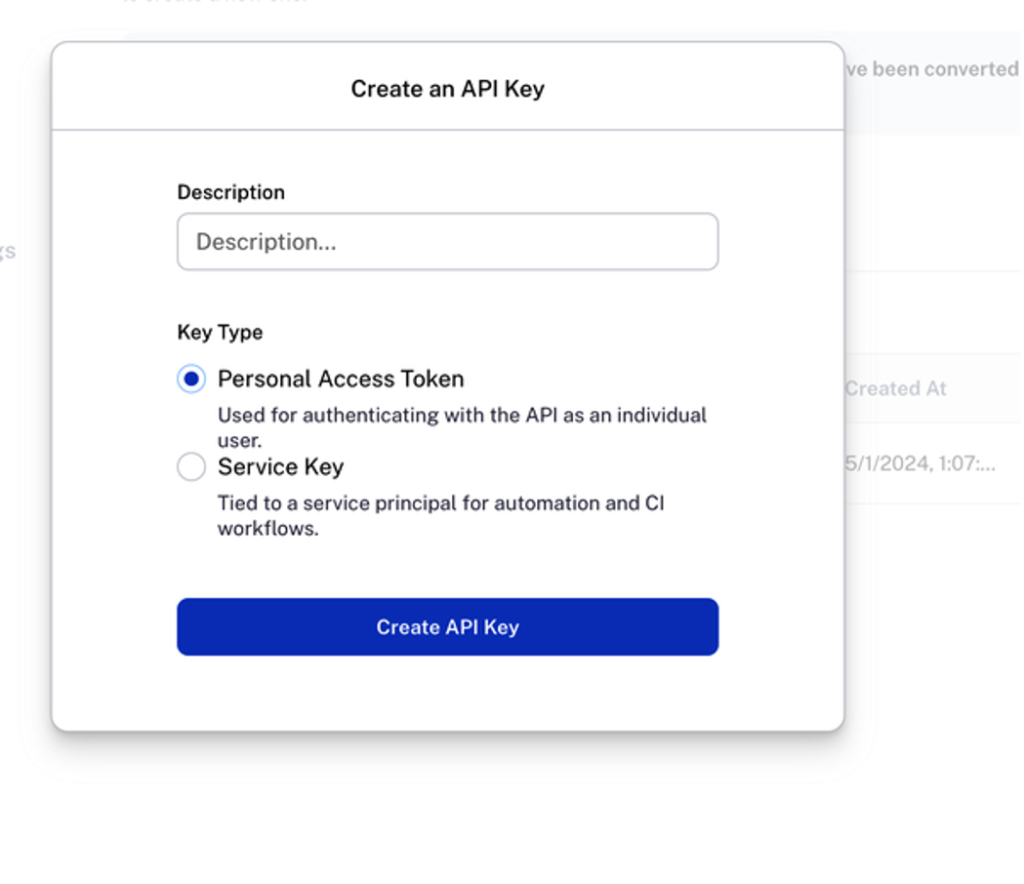
To deploy on LangGraph Platform, create a LangSmith account. From the dashboard, go to Settings → API Keys and click Create API Key. You should see a screen similar to Figure 4.
Copy the generated key into your .env file as LANGCHAIN_API_KEY.
Next, navigate to Usage and billing to set up billing details. Under Plans and Billing, select Upgrade to Plus to enable LangGraph Platform access.
Alternatively, you can use a free self-hosted deployment, which requires managing your own infrastructure, including databases and Redis instances.
Understanding the LangGraph Platform API
Before deploying on LangGraph Platform, it’s important to understand its core API components, which fall into two categories: data models and features.
Data Models
The LangGraph Platform API is built around four core data models:
- Assistants
- Threads
- Runs
- Cron jobs
Assistants
An assistant is a configured instance of a CompiledGraph. It represents the graph’s cognitive architecture along with instance-specific configuration and metadata. Multiple assistants can reference the same graph while behaving differently. Assistants are executed as part of a run, and the API provides endpoints to manage them.
Threads
A thread stores the accumulated state of one or more runs. When a run executes on a thread, the graph’s state is persisted and can be retrieved later. Each saved state is called a checkpoint, and threads must be created before running agents that require persistence.
Runs
A run is a single invocation of an assistant, optionally associated with a thread. Each run can have its own input, configuration, and metadata, which may affect execution and output. The API includes endpoints for managing runs.
Cron Jobs
Cron jobs allow assistants to run on a predefined schedule. LangGraph Platform creates a new thread for each scheduled execution and passes in the specified input automatically.
Features
LangGraph Platform also provides features to support advanced agentic workflows:
- Streaming
- Human-in-the-loop
- Double texting
- Stateless runs
- Webhooks
Streaming
Streaming improves responsiveness by sending partial execution results to clients. LangGraph Platform supports multiple streaming modes:
- Values: Full graph state after each super-step
- Messages: Complete messages and tokens (chat-oriented)
- Updates: State updates after each node
- Events: All execution events, including token-level output
- Debug: Debug information during execution
Human-in-the-loop
To prevent unintended or harmful actions, LangGraph Platform supports human intervention at critical checkpoints, such as tool usage or document access, ensuring safer agent behavior.
Double Texting
Double texting occurs when a user sends a new input before the current run finishes. LangGraph Platform supports four handling strategies:
- Reject: Disallow follow-up inputs
- Enqueue: Run inputs sequentially
- Interrupt: Pause execution, insert new input, and continue
- Rollback: Discard progress and restart with new input
Stateless Runs
Stateless runs simplify execution by automatically creating and cleaning up threads without storing checkpoints. They:
- Accept user input
- Create a temporary thread
- Execute the run without persistence
- Clean up afterward
Retries preserve memory, but background stateless runs restart fully if interrupted.
Webhooks
LangGraph Platform supports completion webhooks, allowing your application to receive notifications when runs finish.
Deploying Your AI Application on LangGraph Platform
With your accounts set up, .env configured, and core AI logic complete, you’re ready to deploy your application on LangGraph Platform.
Create a LangGraph API Config
Before deployment, define a configuration file called langgraph.json. Example for a Python project:
{
  "dependencies": ["./my_agent"],
  "graphs": {
    "agent": "./my_agent/agent.py:graph"
  },
  "env": ".env"
}
Example Repository Structure
my-app/
├── my_agent/           # all project code
│   ├── utils/
│   │   ├── __init__.py
│   │   ├── tools.py    # helper tools
│   │   ├── nodes.py    # node functions
│   │   └── state.py    # graph state definition
│   ├── requirements.txt
│   ├── __init__.py
│   └── agent.py        # constructs the graph
├── .env                # environment variables
└── langgraph.json      # LangGraph config
The langgraph.json file should be at the same level or higher than the compiled graph files. Dependencies can also be specified in requirements.txt, pyproject.toml, setup.py, or package.json.
Config Properties
- dependencies: List of project dependencies for the LangGraph API server.
- graphs: Map of graph IDs to the path of the compiled graph or graph factory function.
- env: Path to your
.envfile or a mapping of environment variables.
This config allows LangGraph Platform to locate and deploy your agent correctly.
Test Your LangGraph App Locally
Before deployment, test your application locally to catch errors or dependency conflicts. Use the LangGraph CLI to run a local development server with hot reloading and debugging.
Install the CLI (Python)
Requires Python 3.11 or higher:
pip install -U "langgraph-cli[inmem]"
Start the local API server:
langgraph dev
If successful, you’ll see:
Ready!
API: http://localhost:2024
Docs: http://localhost:2024/docs
The /docs endpoint provides the local API reference. You can also interact via cURL, but the easiest way is through the auto-launched LangGraph Studio UI or the LangGraph SDK.
Python SDK Example
from langgraph_sdk import get_client
import asyncio

async def run_graph():
    client = get_client()  # pass url= if you changed the default port
    assistant_id = "agent"

    # Create a thread
    thread = await client.threads.create()

    # Define input
    input_data = {"messages": [{"role": "user", "content": "what's the weather in sf"}]}

    # Stream results from the graph
    async for chunk in client.runs.stream(
        thread["thread_id"],
        assistant_id,
        input=input_data,
        stream_mode="updates",
    ):
        print(f"Receiving new event of type: {chunk.event}...")
        print(chunk.data)
        print("\n\n")

# Run the async function
asyncio.run(run_graph())
If the graph executes successfully, you should see streamed output in your console, confirming that the application is functioning correctly.
Here’s a compact, blog-ready version of your section, keeping the structure and figure references, focusing on steps and key points:
Deploy from the LangSmith UI
Once your LangGraph API is working locally, deploy it via the LangSmith dashboard.
- Navigate to Deployments
Open your LangSmith dashboard and click the Deployments tab. LangGraph Platform deployment UI page - Create a New Deployment
Click New Deployment. If you don’t see this button, ensure you’ve upgraded to LangSmith Plus under Usage and billing. - Complete Deployment Details
- Import repository: Select “Import with GitHub” and authorize the LangChain hosted-langserve GitHub app. Choose the repository to deploy.
- Deployment name & config: Provide a name and full path to
langgraph.json(e.g.,langgraph.jsonin the root). - Git reference: Specify the branch to deploy.
- Select Development Type
Choose Production for a deployment capable of handling up to 500 requests/sec with highly available storage and automatic backups. - Set Environment Variables
Enter.envvalues here. For sensitive keys (likeOPENAI_API_KEY), tick Secret before input. - Submit Deployment
Click the submit button. After a few seconds, a new revision will appear associated with the deployment.
LangGraph Platform integrates monitoring within LangSmith, enabling tracking of usage, errors, performance, and costs. For example, the Trace Count chart visualizes successful, pending, and error traces over time (Figure 5).
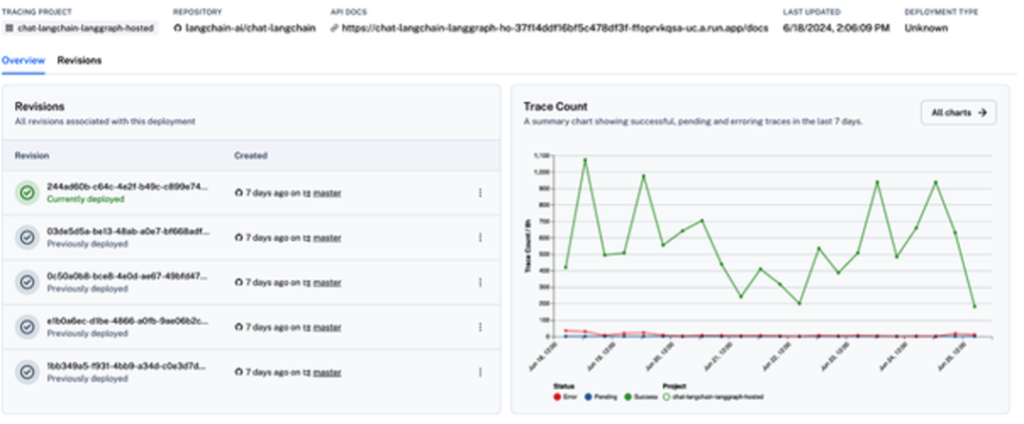
- To view build and deployment logs, select a revision from the Revisions tab and open the Deploy tab.
- To create a new deployment, click New Revision and fill out the same fields.
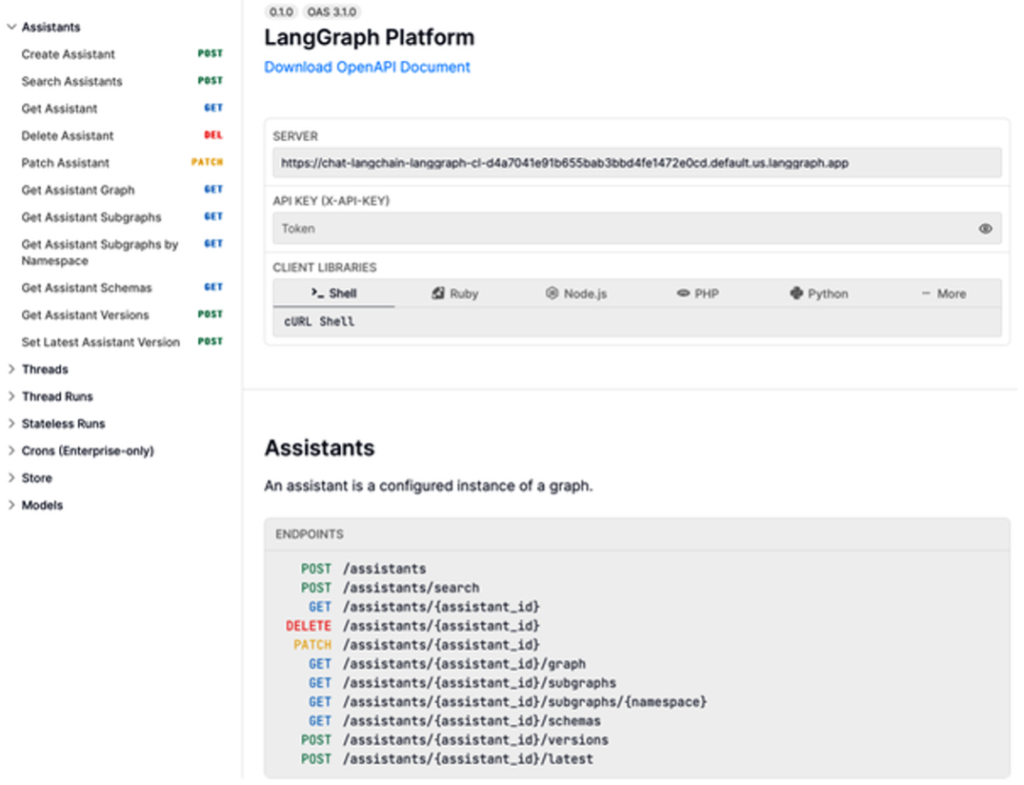
- Access API documentation via the API docs link (Figure 6).
This workflow makes deploying, monitoring, and iterating on your AI application straightforward and fully integrated.
Launch LangGraph Studio
LangGraph Studio is a specialized agent IDE for visualizing, interacting with, and debugging complex agentic applications. It allows you to modify an agent’s output or the logic of a specific node mid-execution, creating an interactive, iterative workflow.
Once your AI application is deployed, click the LangGraph Studio button in the top-right corner of the deployment dashboard (Figure 7).

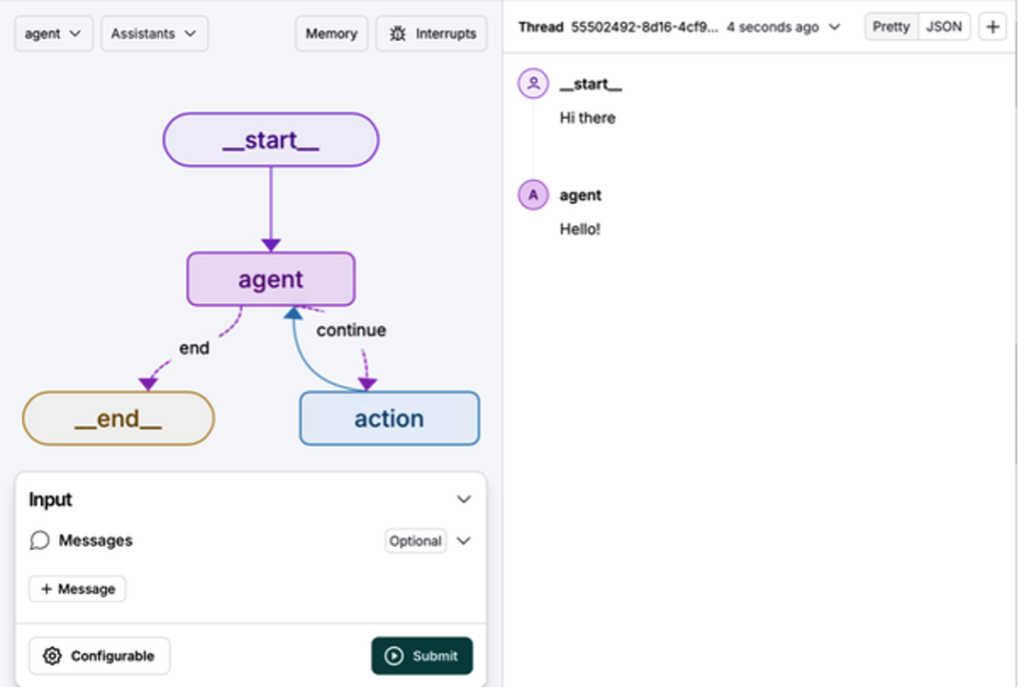
After launching, you’ll see the LangGraph Studio UI (Figure 8).

Invoke a Graph
- Select a graph from the drop-down menu (e.g.,
agent). - In the Input section, click + Message and enter your input.
- Click Submit to run the graph.
View the output in the right-hand pane (Figure 9).
Additional Features
LangGraph Studio also lets you:
- Modify run configurations
- Create and edit threads
- Interrupt ongoing runs
- Edit graph code
- Enable human-in-the-loop intervention
It’s also available as a desktop app (Apple Silicon), enabling local testing before sharing your application with external users.
With LangGraph Studio, your AI application is now ready for production deployment, but key security considerations should be reviewed before external use.
Security
AI applications are powerful but vulnerable to risks such as data corruption, unauthorized access, and performance compromise, which can lead to legal, reputational, and financial consequences. Follow these best practices to mitigate risks:
Limit Permissions
Grant only the minimum permissions necessary. Use read-only credentials, disallow access to sensitive resources, and sandbox agents (e.g., in containers) to reduce vulnerabilities.
Anticipate Misuse
Assume any system access or credentials can be misused. For example, database credentials allowing deletions may be exploited if an LLM has access.
Defense in Depth
Combine multiple layers of security rather than relying on a single measure. For instance, pair read-only credentials with sandboxing to limit access strictly to intended data.
Example Scenarios
- File Access: Restrict agents to specific directories and safe read/write files; sandbox them in containers.
- API Access: Limit agents to read-only API keys or endpoints resistant to misuse.
- Database Access: Scope credentials to only the necessary tables; prefer read-only access.
Mitigating Abuse and Cost
- Account Verification: Require email or phone verification for new users.
- Rate Limiting: Implement middleware checks to restrict excessive requests and prevent exponential costs.
- Prompt Injection Guardrails: Ensure strict permission scoping and specific prompts to prevent malicious LLM behavior, such as leaking confidential data or producing unintended outputs.
By applying these layered security practices, you can safely deploy your AI application while minimizing operational and financial risks.
Summary
In this chapter, we covered best practices for deploying your AI application and enabling user interaction. Key topics included:
- Recommended services for production, such as LLMs, vector stores, and backend APIs.
- Using LangGraph Platform to deploy and host agents at scale, alongside LangGraph Studio for visualization, interaction, and debugging.
- Security best practices to reduce risks of data breaches and misuse.
In Chapter 10, we’ll explore how to evaluate, monitor, benchmark, and optimize the performance of your AI application.